|
|
Please thoroughly read this page before taking photos
Mandatory rules
If you don't follow these mandatory rules we won't be able to use your photos at all.
- Maximum resolution and maximum quality
- Set your camera to the maximum resolution, i.e. set it to the largest Image Size. If you can also change the Image Quality please use the highest quality setting (sometimes referred as Superfine or SHQ or a similar term).
- Don't edit the photos
- Send the photos in their original format (JPG), as taken directly from the memory card of the camera. Never edit the photos in any way.
- Horizontal photos only
- Shoot all photos in horizontal format (landscape format). Never turn the camera 90 degrees to shoot vertical photos (portrait format), even if there's a lot of free space on the left and right side of the model. We won't use vertical photos at all.
- Don't tilt the camera
- Hold the camera strictly horizontally in order to avoid sloping horizons and diagonally leaning girls, so never tilt the camera to the left or right.
- Wide-angle only, Never zoom in
- Shoot all pictures in normal wide-angle, i.e. in 30mm to 45mm focal length (according to normal 35mm film). Never use extreme wide-angles (anything below 28mm) or tele lens (anything over 50mm).
- If you want to take a close-up photo do NOT zoom in but walk some steps closer with the camera itself, while keeping the lens always at the wide-angle position.
- ISO 100
- If you use a normal compact camera shoot all photos with ISO 100. Higher ISO speeds (200 and over) will make the pictures noisy and unusable. Please note that this doesn't apply to DSLRs. With a DSLR you can use ISO speeds up to 400, with newest DSLRs probably up to ISO 800.
Important advices
Please follow all these advices to get good photos.
- 1. Always shoot in bright light. Daylight is the best.
- The quality of the photo depends on the surrounding light. The brighter the light the better the image quality. Whenever possible please shoot the photos outdoors in bright daylight, this gives the best results. Direct sun is even better, so whenever you can choose between a shady place (e.g. under a roof or tree) and a sunny place nearby please use the sunny place for shooting. Have the sun in the back of the photographer so it shines on the model. Don't have the sun in the back of the model. When you shoot outdoors switch off the flash.
- 2. When taking photos indoors with a compact camera.
- First of all set it to ISO 100. Don't use higher ISO speeds to compensate low lighting. Don't shoot in the evening or night, when the room must be lit by artificial light (e.g. light bulbs). Shoot only during the day and have the daylight flow through the room by opening all curtains and jalousies. Try to get as much daylight into the room as possible. Set the FLASH MODE to Auto. Important: Switch off any light bulbs. Use only daylight and flashlight. Don't use any artificial lights.
- 3. When taking photos indoors with a DSLR.
- First of all set it to ISO 400. Shoot either with daylight/flashlight (as described in Advice 2) or shoot at night with artificial light only. Don't use normal light bulbs, their lighting is too low. Use two 500W halogen-lamps (the cheap ones with a tripod, often found in garden or tool shops). Direct one lamp up so that the light is reflected by the white ceiling (so you have a general lighting of the room) and direct the other lamp as a spotlight on the girl from a corner of the room (not too close). Make sure to have absolutely no daylight in the room when you're using artificial light (see Advice 4).
- 4. Never mix artificial light with daylight/flashlight.
- Do not use light bulbs (or other artificial lights) together with daylight/flashlight, as this mixture results in terrible coulour casts. Please use only one of the following three possibilities:
-
- (a) Artificial Light Only. 2x500W halogen-lamps. Make sure to have absolutely no daylight in the room.
- (b) Daylight Only. Make sure to have absolutely no artificial lights in the room. Switch off all light bulbs.
- (c) Mixture of Daylight and Flashlight. Make sure to have absolutely no artificial lights in the room. Switch off all light bulbs.
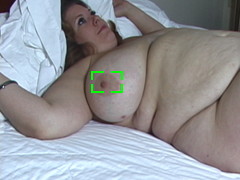
- 5. Make sure that the camera has focused properly.
- First press the shutter button only halfway to focus and wait until the camera has focused properly (often indicated by a green light). After the camera has focused properly press the shutter button all the way down to actually shoot the photo. If you press it too early the photo may get blurry.
- 6. Hold the camera still. Hold the model still.
- Hold the camera absolutely still when pressing the shutter button. Also the model should not move when taking the picture. Any slight movement of the camera or the model may cause blurry photos. Press the shutter button very gently to avoid camera movement.
- 7. Never use shutter speeds below 1/30s.
- In general: The faster the shutter speed, the sharper the picture. Slow shutter speeds are bad. Never shoot with shutter speeds slower than 1/30s. Shooting with 1/20s or 1/8s will make the photos blurry and unusable. Increase the lighting to get a faster shutter speed.
- 8. Never have a bright light behind the model.
- If the camera is set to AUTO exposure and it is seeing a bright light (e.g. a lamp, a bright window or the sun) the AUTO exposure will darken the picture and the photo gets unusable. So make sure that bright lights are always in the rear of the photographer (so that the camera doesn't see them).
-
 |
Bad
The bright window in the background darkens the picture. To avoid that turn 180 degrees so that the bright window is in the rear of the photographer. |
- 9. Fill the picture frame with the model. Avoid wasted space.
- Always fill the picture frame with the model, either vertically or horizontally. If the model's head is visible make it touch the upper edge of the picture frame. Avoid wasted space above the model's head.
-
 |
Bad
There's wasted space above the model's head. The camera should move down. |
 |
Good
There's no wasted space above the model's head. The head touches the upper edge of the picture frame. |
 |
Bad
There's wasted space at the top and at the right side. Don't take such photos. |
 |
Good
Move the camera down and left until the model fills the picture frame. It's much better to see the thighs instead of the grey wall. |
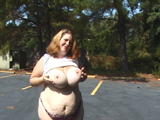
- 10. Don't stare just into the middle of the camera display. Check its edges.
- Many photographers look only into the middle of the camera display and don't care about its edges. Therefore they're placing important parts of the model's body (head, breasts) right into the middle of the picture frame. This results in bad picture compositions with wasted space (see examples below). So before actually taking the picture always check the edges of the camera display to notice wasted space and then slightly move the camera to get a good picture composition with no wasted space.
-
 |
Bad
The photographer has just stared into the middle of the LCD, and therefore he placed the breasts in the middle of the picture frame. He didn't notice the wasted space on the left side. That's bad. It would be much better to move the camera slightly to the right so we can see the model's beautiful ass rather than some useless trees. |
- Here are another four bad examples. The photographer hasn't checked the edges of the picture frame and therefore didn't notice the wasted space:
-
 |
 |
 |
 |
Bad
There's wasted space at the top. |
Bad
There's wasted space at the bottom. |
Bad
There's wasted space at the left and at the top. |
Bad
There's wasted space at the right. |
- 11. Compose the picture before pressing the shutter button fully down.
- Always use the following two-step procedure for shooting a photo. This procedure is called AF Lock:
-
 |
 |
Step 1: Point the Autofocus at the subject to focus on (usually the nipples). Now press the shutter button halfway and wait until the camera has focused properly on the subject. Mostly this is indicated by a green light or green frame around the Autofocus area. |
Step 2: While keeping the shutter button pressed halfway compose the picture, i.e. move the camera slightly up/down or left/right until the model fills the picture frame. When the model is nicely placed inside the picture frame press the shutter button from halfway to fully down to actually take the photo. |
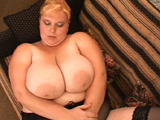
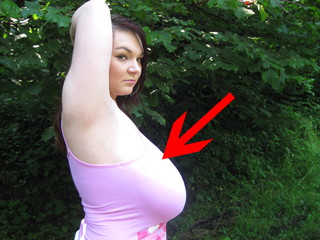
- 12. Don't cut off the lower edge of the breasts.
- Always make sure that the lower edge of the breasts is visible. People want to see the entire curve of the breasts.
-
 |
 |
Bad
The lower edge of the breasts is cut off. Don't shoot like that, but move the camera slightly down. |
Good
The lower edge of the breasts is visible. This gives a good impression of the breast's curves. |
- 13. Beware of dark backgrounds.
- If the camera is set to AUTO exposure it will try to get a good average exposure for all subjects visible in the picture (background and model). The larger the subject the more it will influence the exposure metering. So if the background is dark the camera will brighten it up and the model will get too bright (overexposed).
-
 |
Bad
Due to the dark background the camera brightens the picture and the model's breasts get overexposed (too bright, no details visible, just a plain white area).
To avoid that either
- set the exposure manually, or
- go to a another place, or
- turn to get another background, or
- set EXPOSURE COMPENSATION to "-1"
|
About the content of the photos
Basically there are no rules for the content. You can use any pose or scene or dress you like. But still please consider the following:
- The more variety, the more photos we can buy.
- There should be a lot of variety in the photos. Each photo should significantly differ from the previous one. This means, with each photo either change the model's pose or change the viewing angle or change the camera distance.
- Change clothes every 70 to 100 photos.
- Don't shoot hundreds of photos with the same outfit. The model should change clothes after 70 to 100 photos.
- Wear tight clothes.
- Don't use fancy stuff like feather boas, pearl necklets, Santa Claus costumes or negligees. Please have the model wear tight clothes as going the streets, for instance tight jeans, leggins, miniskirts, tight tops, tight secretary outfits, nylons, high heels, anything that's tight and sexy. Don't use baggy clothes that are hiding the curves of the model's body.
- Take pictures at various places.
- If possible shoot at various places like in the living room, in the kitchen, in the home office, in the car, on a park bench, on the beach, on the streets and so on. Whenever possible shoot outdoors in bright daylight. Our members do love outdoor pictures.
- The model shouldn't be naked or topless all the time.
- Shoot all stages from fully clothed to topless or naked. Within a photo series the model doesn't necessarily have to be clothed first and topless at the end. You may alternate from clothed to naked several times within a photo series with the same outfit. For instance the model is wearing a tight sweater, so take some pictures clothed, then have the model lift the sweater so we see her breasts below, then take some photos clothed again, then have the breasts stick out from the top of the sweater, and so on.
- Don't shoot just "Head And Breasts" photos.
- That's important. It's boring to constantly have to watch only the upper part of the model's body ("Head And Breasts"). Please take photos of all parts of the model's body including her ass, belly, thighs, legs. It's great to watch all aspects of a curvy body.
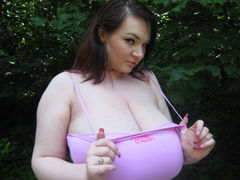
- Let the breasts often hang freely.
- The model shouldn't fumble her breasts all the time. We've got many complaints from our members about models constantly holding and grasping their breasts with their hands. Please let the breasts hang freely at least in half of the photos.
- Change the perspective often.
- Don't just keep on standing in front of the model shooting dozens of photos from the same perspective. This looks boring. Please do this:
-
- Vary the camera distance, e.g. shoot a close-up, then step back for a distant shot, then go a bit closer again, then back again and so on.
- Vary the viewing angle, e.g. shoot from above, from below, at normal height, and so on.
- Vary the position, e.g. don't shoot just from a frontal view, but also shoot from side view, from behind, from half left, from half right, and so on.
|